What is this? How can a slave have multiple masters? Well the architecture is not what the name implies. A slave can have only one master. But here we are going to create a loop between slaves and masters, also known as Circular replication.
Lets take 3 machines. (Since i have only a single machine - my laptop - i created 3 instances of mysql running on 3 different ports and with 3 different data directories to work out this architecture.) Suppose, we have installed mysql on all the 3 machines/nodes - say NodeA, NodeB, NodeC. What needs to be done is that NodeA is slave of NodeC, NodeC is slave of NodeB and NodeB is slave of NodeA. So each mysql instance is a master and also a slave. I will go into implementation details of this in a minute. First of all, let me list down the benefits and issues with this setup.
Benefits:
- You can build a high availability and high performance cluster catering to a very busy web site.
- In case if a node goes down, it is comparatively easy to bypass the node and get the cluster up and running in a small time.
Issues:
- There is a small time difference between an insert in the master and the corresponding data being replicated in the slave. Though this time difference is very small, but in this case, since the data has to propagate through all the nodes in the loop, the time difference may be of consecuence as the number of nodes increase.
- The process of detecting and cleaning up a failure in replication still needs manual intervention.
To go into the technicalities, lets say that NodeA, NodeB and NodeC have mysql installed on them. You need to have a mysql version >= 5.0.2 on all the nodes. Also all nodes must have the same mysql version, to maintain compatibility in replication between different versions.
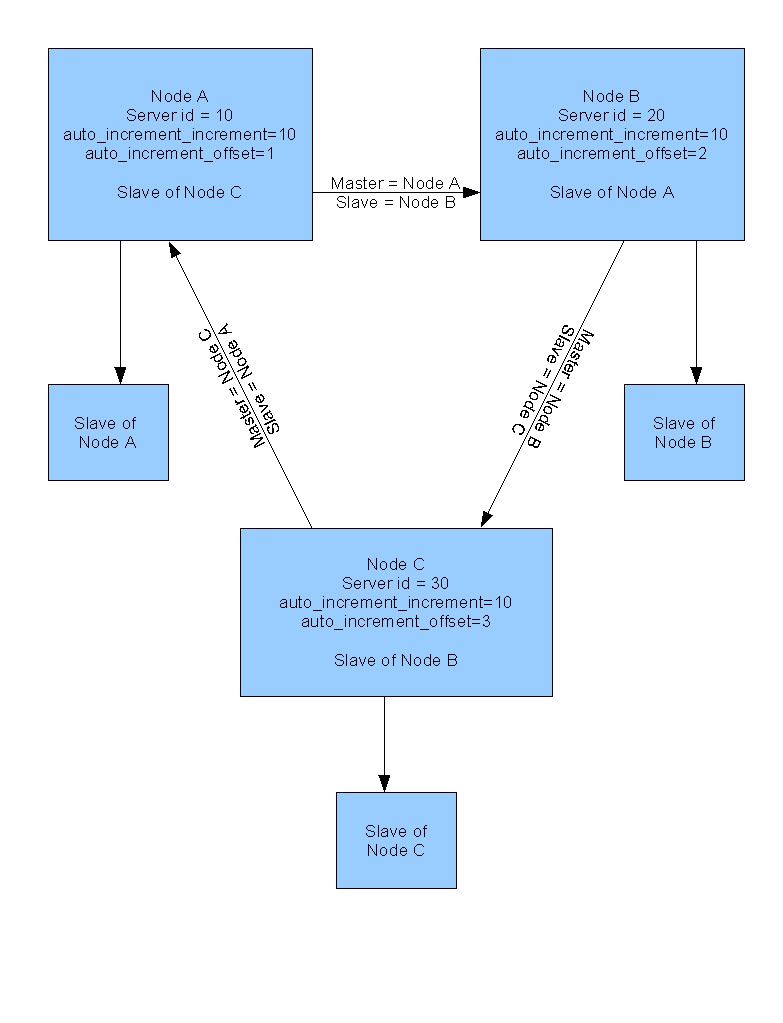
If you are new to mysql replication, please go through the following linkhttp://dev.mysql.com/doc/refman/5.1/en/replication-implementation.html. This will help you to understand how to setup mysql replication.
Following figure explains the complete architecture. You can also add extra slaves for all the nodes which can be used/added to the loop in case if any node goes down or for simple select queries - further increasing the performance.
The configuration files on different nodes were as follows
Node A
=====
[mysqld]
basedir=/usr/local/mysql5
datadir=/usr/local/mysql5/data
socket=/tmp/mysql5.sock
port=3306
# for replication
server-id=10
log-bin
log-slave-updates
replicate-same-server-id=0
auto_increment_increment=10
auto_increment_offset=1
master-host=NodeC_IP
master-user=repl
master-password=jayant
master-port=3306
report-host=NodeA
skip-slave-start
log-slow-queries
log-output=FILE
# log-queries-not-using-indexes
log-slow-admin-statements
[mysql.server]
user=mysql
basedir=/usr/local/mysql5
Node B
=====
[mysqld]
basedir=/usr/local/mysql5
datadir=/usr/local/mysql5/data
socket=/tmp/mysql5.sock
port=3306
# for replication
server-id=20
log-bin
log-slave-updates
replicate-same-server-id=0
auto_increment_increment=10
auto_increment_offset=2
master-host=NodeA_IP
master-user=repl
master-password=jayant
master-port=3306
report-host=NodeB
skip-slave-start
log-slow-queries
log-output=FILE
# log-queries-not-using-indexes
log-slow-admin-statements
[mysql.server]
user=mysql
basedir=/usr/local/mysql5
Node C
=====
[mysqld]
basedir=/usr/local/mysql5
datadir=/usr/local/mysql5/data
socket=/tmp/mysql5.sock
port=3306
# for replication
server-id=30
log-bin
log-slave-updates
replicate-same-server-id=0
auto_increment_increment=10
auto_increment_offset=3
master-host=NodeB_IP
master-user=repl
master-password=jayant
master-port=3306
report-host=NodeC
skip-slave-start
log-slow-queries
log-output=FILE
# log-queries-not-using-indexes
log-slow-admin-statements
[mysql.server]
user=mysql
basedir=/usr/local/mysql5
Once mysql on all 3 nodes are properly setup, all that needs to be done is run a "START SLAVE" command on all of them. This will bring the circular loop in function. Now you can have an array of mysql connections in your application and may be do a round robin execution of any type of queries (select, update, insert, delete) using the array on any of the machines in the cluster.
Points to be noted:
- server-id has to be different for each of the machine in the circular replication
- log-slave-updates tells the mysql slave to log queries that are replicated from master to its binary log, so that they can be passed on to who-so-ever is reading its binary log
- replicate-same-server-id tells the mysql slave not to replicate its own queries in circular replication. If this variable is ignored, the setup may result in an infinite loop where a query fired on node A may keep on replicating itself repeatedly. This variable should be set to 0 so that the mysql slave does not replicate events that have its own server id. Preventing infinite loops.
- auto_increment_offset determines the starting point of auto increment column values.
- auto_increment_increment determines the increment between auto increment values.
auto_increment_increment and auto_increment_offset have to be used so that auto increment values on different servers do not conflict with each other. If this is not used, then, when a query is fired on node A and node B simultaneously or may be the replication between node A and node B breaks after the first query is fired on node A and before the second query is fired on node B.
On any Node
create table x(id int auto_increment primary key, val varchar(250) null);
On Node A
insert into table x(val) values ('in node a');
On Node B
insert into table x(val) values ('in node b');
In this case a "duplicate primary key" error will come when the query from node A is replicated and run on node B.
But if these variables are set appropriately, there would be no such issue. The above setup has auto_increment_increment set to 10 allowing addition of upto 10 nodes in the cluster.
For more details on this you can refer http://www.onlamp.com/pub/a/onlamp/2006/04/20/advanced-mysql-replication.html. It is a very lengthy article but very detailed. Explains failover mechanisms and also provides some scripts for detecting breakages in the loop.
Courtesy goes to Jayant.


