Drop all tables in one shot:
mysql --user=xxxx --password=xxxx -BNe "show tables" database_name | tr '\n' ',' | sed -e 's/,$//' | awk '{print "SET FOREIGN_KEY_CHECKS = 0;DROP TABLE IF EXISTS " $1 ";SET FOREIGN_KEY_CHECKS = 1;"}' | mysql --user=xxxx --password=xxxx database_name
Friday, November 18, 2011

Saturday, September 11, 2010
Change PuTTYs Default Scrollback Values
1. Go to Run (Win+R), type regedit and press enter.
2. In the registry editor, press Ctrl+F to bring up the search box and search for SimonTatham
3. Expand the result SimonTatham > PuTTY > Sessions
4. Select a session for which scrollback value need to be changed. Scroll down on the right pane until you find the value ScrollbackLines
5. Double click on ScrollbackLines and change its value to 200000. Make sure you click the decimal radio button before modifying the value.
6. Press OK and you are done. Launch PuTTY and observe the default settings.
2. In the registry editor, press Ctrl+F to bring up the search box and search for SimonTatham
3. Expand the result SimonTatham > PuTTY > Sessions
4. Select a session for which scrollback value need to be changed. Scroll down on the right pane until you find the value ScrollbackLines
5. Double click on ScrollbackLines and change its value to 200000. Make sure you click the decimal radio button before modifying the value.
6. Press OK and you are done. Launch PuTTY and observe the default settings.
Tuesday, August 31, 2010
Troubleshooting Relay Log Corruption
Did you ever encountered the below error in the slave status.
mysql> show slave status\G
*************************** 1. row ***************************
Slave_IO_State: Waiting for master to send event
Master_Host: 10.x.x.x.
Master_User: abcd
Master_Port: 3306
Connect_Retry: 60
Master_Log_File: master-bin.000875
Read_Master_Log_Pos: 163966855
Relay_Log_File: slave-relay-bin.002638
Relay_Log_Pos: 238770262
Relay_Master_Log_File: master-bin.000874
Slave_IO_Running: Yes
Slave_SQL_Running: No
Replicate_Do_DB:
Replicate_Ignore_DB:
Replicate_Do_Table:
Replicate_Ignore_Table:
Replicate_Wild_Do_Table:
Replicate_Wild_Ignore_Table:
Last_Errno: 0
Last_Error: Could not parse relay log event entry. The possible reasons are: the master's binary log is corrupted (you can check this by running 'mysqlbinlog' on the binary log), the slave's relay log is corrupted (you can check this by running 'mysqlbinlog' on the relay log), a network problem, or a bug in the master's or slave's MySQL code. If you want to check the master's binary log or slave's relay log, you will be able to know their names by issuing 'SHOW SLAVE STATUS' on this slave.
Skip_Counter: 0
Exec_Master_Log_Pos: 238770119
Relay_Log_Space: 1237710237
Until_Condition: None
Until_Log_File:
Until_Log_Pos: 0
Master_SSL_Allowed: No
Master_SSL_CA_File:
Master_SSL_CA_Path:
Master_SSL_Cert:
Master_SSL_Cipher:
Master_SSL_Key:
Seconds_Behind_Master: NULL
1 row in set (0.00 sec)
The error messages says that the possibilities are slave relay log corruption, master binlog corruption, network problem, or a bug.
But, as far as I investigated this error is occured due to slave relay log corruption. Try to run mysqlbinlog on the relay log file which will most probably throw the below error.
-bash-3.00$ /usr/local/mysql/bin/mysqlbinlog slave-relay-bin.002638 > /tmp/slave-relay-bin.002638_log
ERROR: Error in Log_event::read_log_event(): 'Event too small', data_len: 0, event_type: 0
Could not read entry at offset 238770262:Error in log format or read error
The above error ensures that the slave relay log file is corrupted. In this case you need to execute the below in your slave to restart your replication.
mysql> slave stop;
Query OK, 0 rows affected (0.00 sec)
mysql> CHANGE master TO master_log_file='Relay_Master_Log_File',master_log_pos=Exec_Master_Log_Pos;
Query OK, 0 rows affected (1.16 sec)
mysql> slave start;
Query OK, 0 rows affected (0.00 sec)
Hope this post is useful for someone.
mysql> show slave status\G
*************************** 1. row ***************************
Slave_IO_State: Waiting for master to send event
Master_Host: 10.x.x.x.
Master_User: abcd
Master_Port: 3306
Connect_Retry: 60
Master_Log_File: master-bin.000875
Read_Master_Log_Pos: 163966855
Relay_Log_File: slave-relay-bin.002638
Relay_Log_Pos: 238770262
Relay_Master_Log_File: master-bin.000874
Slave_IO_Running: Yes
Slave_SQL_Running: No
Replicate_Do_DB:
Replicate_Ignore_DB:
Replicate_Do_Table:
Replicate_Ignore_Table:
Replicate_Wild_Do_Table:
Replicate_Wild_Ignore_Table:
Last_Errno: 0
Last_Error: Could not parse relay log event entry. The possible reasons are: the master's binary log is corrupted (you can check this by running 'mysqlbinlog' on the binary log), the slave's relay log is corrupted (you can check this by running 'mysqlbinlog' on the relay log), a network problem, or a bug in the master's or slave's MySQL code. If you want to check the master's binary log or slave's relay log, you will be able to know their names by issuing 'SHOW SLAVE STATUS' on this slave.
Skip_Counter: 0
Exec_Master_Log_Pos: 238770119
Relay_Log_Space: 1237710237
Until_Condition: None
Until_Log_File:
Until_Log_Pos: 0
Master_SSL_Allowed: No
Master_SSL_CA_File:
Master_SSL_CA_Path:
Master_SSL_Cert:
Master_SSL_Cipher:
Master_SSL_Key:
Seconds_Behind_Master: NULL
1 row in set (0.00 sec)
The error messages says that the possibilities are slave relay log corruption, master binlog corruption, network problem, or a bug.
But, as far as I investigated this error is occured due to slave relay log corruption. Try to run mysqlbinlog on the relay log file which will most probably throw the below error.
-bash-3.00$ /usr/local/mysql/bin/mysqlbinlog slave-relay-bin.002638 > /tmp/slave-relay-bin.002638_log
ERROR: Error in Log_event::read_log_event(): 'Event too small', data_len: 0, event_type: 0
Could not read entry at offset 238770262:Error in log format or read error
The above error ensures that the slave relay log file is corrupted. In this case you need to execute the below in your slave to restart your replication.
mysql> slave stop;
Query OK, 0 rows affected (0.00 sec)
mysql> CHANGE master TO master_log_file='Relay_Master_Log_File',master_log_pos=Exec_Master_Log_Pos;
Query OK, 0 rows affected (1.16 sec)
mysql> slave start;
Query OK, 0 rows affected (0.00 sec)
Hope this post is useful for someone.
Wednesday, June 30, 2010
mysql hack - altering huge tables
You have a huge mysql table - maybe 100 GB. And you need to run alter on it - to either add an index, drop an index, add a column or drop a column. If you run the simple mysql "alter table" command, you will end up spending ages to bring the table back into production.
Here is a simple hack to get the thing done. The benefit of the hack is that the alter runs quite fast. But since this is a hack, you will need to take care of the backups - in case anything goes wrong. I have seen this hack work effectively with both MyISAM and InnoDB tables.
Here i have created a simple table to show this hack process. You can assume that this table has billions of rows and is more than 100GB in size.
CREATE TABLE `testhack` (
`id` int(11) NOT NULL DEFAULT '0',
`unq` varchar(100) DEFAULT NULL,
`keyword` varchar(250) DEFAULT NULL,
PRIMARY KEY (`id`),
UNIQUE KEY `unq` (`unq`)
) ENGINE=MyISAM
I need to drop the unique key. So, i create a new table testhack_new with the following schema
CREATE TABLE `testhack_new` (
`id` int(11) NOT NULL DEFAULT '0',
`unq` varchar(100) DEFAULT NULL,
`keyword` varchar(250) DEFAULT NULL,
PRIMARY KEY (`id`)
) ENGINE=MyISAM
Flush both tables with read lock
mysql> Flush tables with read lock;
Open another terminal. And go to the mysql/data/
mysql/data/test $ mv testhack.frm testhack_old.frm; mv testhack_new.frm testhack.frm; mv testhack_old.frm testhack_new.frm; mv testhack.MYI testhack_old.MYI; mv testhack_new.MYI testhack.MYI; mv testhack_old.MYI testhack_new.MYI;
So, what is happening here is that the index, table definitions are being switched. After this process, the table definition of testhack will not contain the unique key. Now unlock the tables in the main window. And run repair tables to remove any issues.
mysql> unlock tables;
mysql> repair tables testhack;
+---------------+--------+----------+-------------------------------------------+
| Table         | Op     | Msg_type | Msg_text                                  |
+---------------+--------+----------+-------------------------------------------+
| test.testhack | repair | warning  | Number of rows changed from 0 to 20000000 |
| test.testhack | repair | status   | OK                                        |
+---------------+--------+----------+-------------------------------------------+
The repair table rebuilds the indexes. It is faster since it skips the use of key_cache for rebuilding the index (which is used in a normal alter table scenario).
Friday, June 11, 2010
mysql cluster
The NDB mysql cluster is an in-memory storage engine which offers high availability and data-persistence features. Mysql cluster is available with mysql-5.1 and with mysql5.0-max binaries. This can also be compiled after obtaining the source and the binaries can be used.
We will have a quick start to mysql ndb cluster here...
The basics first :
There are 3 nodes/services necessary to start when you are planning to run a mysql cluster
1. The NDB management node daemon ndb_mgmd.
2. The SQL node - a simple mysql server (mysqld).
3. Data nodes - running NDBD daemon
The best configuration would be to have at least 4 differet machines to run the mysql cluster on. The management node could be any small machine. All the management node does is check the cluster on periodic basis and other management functionalities like stop a node, start another node and stuff like that.
The Data nodes need to be high configuration machines - having lots of RAM. This is because the mysql cluster is a memory based cluster which means that the data resides in memory. The more memory you have the better the engine would perform.
And finally the SQL node should be a good machine since it will be doing some processing also. Though it should not require high amounts of RAM.
Steps to install and get mysql cluster running :
step 1:
install mysql 5.1 (binary) on 3 machines (2 data nodes and 1 sql node).
my.cnf on these nodes can be as below:
[mysqld]
ndbcluster
ndb-connectstring=ip.of.mgmnode
[mysql_cluster]
ndb-connectstring=ip.of.mgmnode
step 2:
untar the binary of mysql-5.1 and copy the files ndb_mgm & ndb_mgmd to /usr/local/bin
There is no need to keep the binary of mysql. Once the ndb_mgm* files are copied to bin directory, the untared binary of mysql can be deleted.
step 3:
configuring the mgm node.
create a directory "mkdir /var/lib/mysql-cluster".
create a file config.ini and incorporate mysql cluster settings in it
config.ini
[NDB DEFAULT] #affects settings of all data nodes
#No of replicas. Must divide evenly into the no of data nodes. So for 2 data nodes the no of replicas can be 1 or 2.
NoOfReplicas=2
# Memory allocated for data storage. Used for storing actual records and indexes. The memory space allocated consists of 32K pages. Once a page is allocated, it cannot be returned to the free pool, except by deleting the table. Default value is 80 MB. Minimum is 1 MB and max is dependent on available system memory.
DataMemory=1024M
# Memory allocated for Index storage (Hash indexes in mysql cluster). Hash indexes are used for primary key, unique indexes. Default value is 18 MB. Minimum is 1 MB and max is dependent on available system memory.
IndexMemory=128M
# Log levels. Used to log messages for various events. By default all loggings are disabled. For our reference we would set the log level to 5 for Startup messages and 10 for Error messages/warnings. Minimum level is 0 (disabled) and maximum is 15.
LogLevelStartup=5
LogLevelError=10
[TCP DEFAULT] # TCP/IP options
# no settings required for normal setup
[NDB_MGMD] # Options for the management process
hostname=ip.of.mgmnode
# Data directory - Directory where output files from the management server will be placed. It includes cluster log files, process output files and daemon's pid file.
datadir=/var/lib/mysql-cluster
[NDBD] # Options for data node "A"
hostname=ip.of.datanode_A
# datadir specifies the directory on data node "A" where trace, log, pid and error log files are placed
datadir=/usr/local/mysql/data # assuming the path on node "A"
[NDBD] # Options for data node "B"
hostname=ip.of.datanode_B
datadir=/usr/local/mysql/data # assuming the path on node "B"
[MYSQLD] # Options for the SQL node
hostname=ip.of.sqlnode
step 4:
Start the cluster. Hang on. The way to start the cluster is to first start the management node. Use the following command on management node machine.
ndb_mgmd -f /var/lib/mysql-cluster/config.ini
now run "ndb_mgm". It will connect to the mgm daemon on port 1186. use the "show" command to list the current settings.
ndb_mgm> show
Connected to Management Server at: localhost:1186
Cluster Configuration
---------------------
[ndbd(NDB)] 2 node(s)
id=2 (not connected, accepting connect from ip.of.datanode_A)
id=3 (not connected, accepting connect from ip.of.datanode_B)
[ndb_mgmd(MGM)] 1 node(s)
id=1 @ip.of.mgmnode (Version: 5.1.14)
[mysqld(API)] 1 node(s)
id=4 (not connected, accepting connect from ip.of.sqlnode)
Now start the data nodes. On the data nodes run the following command.
./ndbd --initial
The --initial command deletes all log files and clears the data on node machines. Use this parameter only for starting the data node for the first time.
And start the sql node like when you start a mysql server
./bin/mysqld_safe --user=mysql &
And run the "show" command on the mgm node again.
ndb_mgm> show
Cluster Configuration
---------------------
[ndbd(NDB)] 2 node(s)
id=2 @ip.of.datanode_A (Version: 5.1.14, Nodegroup: 0, Master)
id=3 @ip.of.datanode_B (Version: 5.1.14, Nodegroup: 0)
[ndb_mgmd(MGM)] 1 node(s)
id=1 @ip.of.mgmnode (Version: 5.1.14)
[mysqld(API)] 1 node(s)
id=4 @ip.of.sqlnode (Version: 5.1.14)
Ok, now your mysql cluster is up and running.
If you need to restart the mysql cluster safely run the following commands
ndb_mgm -e shutdown # shuts down the mysql management and data nodes
ndb_mgmd -f /var/lib/mysql-cluster/config.ini #start the management node
ndbd # run this on the data nodes to start mysql cluster on data nodes
./bin/mysqld_safe --user=mysql & # And also shutdown and restart the sql node - like you shutdown and restart a normal mysql server.
To create a table using NDB cluster specify "ENGINE=NDBCLUSTER" in the create table syntax. Eg:
Create table testndb (id int, val varchar(255) ENGINE=NDBCLUSTER;
One error that i encountered while working with the NDB cluster is "ERROR 1114 (HY000): The table '#sql-15c1_2' is full". After a bit of digging i found the following in the log files on the mgm node.
2006-12-30 12:50:59 [MgmSrvr] INFO -- Node 3: Data usage increased to 80%(13205 32K pages of total 16384)
2006-12-30 12:50:59 [MgmSrvr] INFO -- Node 2: Data usage increased to 80%(13220 32K pages of total 16384)
2006-12-30 12:51:29 [MgmSrvr] INFO -- Node 3: Data usage increased to 90%(14757 32K pages of total 16384)
2006-12-30 12:51:29 [MgmSrvr] INFO -- Node 2: Data usage increased to 90%(14769 32K pages of total 16384)
2006-12-30 12:51:45 [MgmSrvr] INFO -- Node 2: Local checkpoint 12 started. Keep GCI = 168 oldest restorable GCI = 192
2006-12-30 12:52:13 [MgmSrvr] INFO -- Node 3: Data usage decreased to 86%(14112 32K pages of total 16384)
2006-12-30 12:52:13 [MgmSrvr] INFO -- Node 2: Data usage decreased to 86%(14109 32K pages of total 16384)
2006-12-30 12:52:17 [MgmSrvr] INFO -- Node 3: Data usage decreased to 74%(12212 32K pages of total 16384)
2006-12-30 12:52:17 [MgmSrvr] INFO -- Node 2: Data usage decreased to 74%(12207 32K pages of total 16384)
2006-12-30 12:52:33 [MgmSrvr] INFO -- Node 2: Local checkpoint 13 started. Keep GCI = 193 oldest restorable GCI = 192
I had allocated 512MB as the DataMemory, which was getting exhausted. So i increased the parameter to 1024M (1G) and since then the things are running fine.
The only problem i am facing is that I need huge amounts of RAM for storing the NDB tables. And i am looking for an option to reduce RAM usage and use simple data on disk clusters.
References:
Mysql Cluster Configuration
Mysql Cluster Complete documentation
mysql multi-master replication - Act II
SETUP PROCEDURE
Created 4 instances of mysql on 2 machines running on different ports. Lets call these instances A, B, C and D. So A & C are on one machine and B & D are on another machine. B is slave of A, C is slave of B, D is slave of C and A is slave of D.
(origin) A --> B --> C --> D --> A (origin)
Each instance has its own serverid. A query originating from any machine will travel through the loop replicating data on all the machines are return back to the origniating server - which in effect will identify that the query had originated from here and would not execute/replicate the query further.
To handle auto_increment field, two variables are defined in the configuraion of the server.
1. auto_increment_increment : controls the increment between successive AUTO_INCREMENT values.
2. auto_increment_offset : determines the starting point of AUTO_INCREMENT columns.
Using these two variables, the auto generated values of auto_increment columns can be controlled.
Once the replication loop is up and running, any data inserted in any node would automatically propagate to all the other nodes.
ISSUES WITH MULTI-MASTER REPLICATION & AUTOMATIC FAILOVER
1. LATENCY
There is a definite latency between the first node and the last node. The replication steps lead to the slave reading the master's binary log through the network and writing it to its own relay-bin log. It then executes the query and then writes it to its own binary log. So each node takes a small amount of time to execute and then propagate the query further.
For a 4 node multi-master replication when i replicated a single insert query containing one int and one varchar field, the time taken for data to reach the last node is 5 ms.
This latency would ofcourse depend on the following factors
a) amount of data to be relicated. Latency increases with increase in data
b) Network speed between the nodes. If the data is to replicated over internet, it will take more time as compared to that on nodes in LAN
c) Amount of indexes on the tables being replicated. As the number of indexes increase, the time taken to insert data in tables also increases. Increasig the latency.
d) The hardware of the machine and the load on the machine will also determine how fast the replication between master and slave will take place.
2. AUTOMATIC FAILOVER
Automatic failover can be accomplished using events and federated tables in mysql 5.1. Federated tables are created between master and slave and are used to check connection between master and slave. An event is used to trigger a query on the federated table which checks the connection between master and slave. If the query fails, then a stored procedure can be created which should chunk the master out of the replication loop.
So suppose in the loop shown above, A goes out, then the event on B would detect that A is out and would make D as a master of B.
This is the theoretical implementation of automatic failover. Practically there are a few issues with its implementation.
a) for failover, you need to know the position of master's master from where the slave should take over. (So B should know the position on D from where it has to start replication). One of the ways to do this is that each slave logs its master's position on a table which is replicated throughout the loop. But this again is not possible using events & stored procedures - cause there is no query which can capture the information available from "SHOW SLAVE STATUS" query in a variable and write it in a table. Another way to do this is to have an external script running at an interval of say 10 seconds which logs this information and checks the federated tables for any disruption in the master-slave connection. With this methodology, the problem is that there could be a 10 second window period during which data can be lost.
b) You could also land into an infinite replication situation. Lets look how using the 4 node example above. Suppose "A" goes down and It has a query in its binary log which has to be replicated throught the loop. So the query propagates from "B" to "C" and finally to "D". Now since "A" is down and failover has happened, "B" would be the slave of "D". So the query which originated from "A" would go from "D" to "B". Thats because if "A" would have been there, it would have identified its own query and stopped it. But since "A" is out of the loop, the query will not be stopped and it will propagate to "B" and will always be in the loop. This can result in either the query running in the loop indefinitely or an error on all the slaves and all the slaves going down.
These are the major issues with multi-master replication and automatic failover. Though one can still live with the automatic failover scenario - as it might occur once in a while. But the latency between first and last node during replication has no solution. This latency is due to physical constraints and cannot be avoided.
A work around would be distributing the queries based on tables on all the nodes. So that queries for a table would always be served from a single node. But this then would result in table locks on that node and again we would not be able to reap the benefits of multi-master replication.
Thanks to Jayant for this post.
Multi-Master replication in mysql
What is this? How can a slave have multiple masters? Well the architecture is not what the name implies. A slave can have only one master. But here we are going to create a loop between slaves and masters, also known as Circular replication.
Lets take 3 machines. (Since i have only a single machine - my laptop - i created 3 instances of mysql running on 3 different ports and with 3 different data directories to work out this architecture.) Suppose, we have installed mysql on all the 3 machines/nodes - say NodeA, NodeB, NodeC. What needs to be done is that NodeA is slave of NodeC, NodeC is slave of NodeB and NodeB is slave of NodeA. So each mysql instance is a master and also a slave. I will go into implementation details of this in a minute. First of all, let me list down the benefits and issues with this setup.
Benefits:
- You can build a high availability and high performance cluster catering to a very busy web site.
- In case if a node goes down, it is comparatively easy to bypass the node and get the cluster up and running in a small time.
Issues:
- There is a small time difference between an insert in the master and the corresponding data being replicated in the slave. Though this time difference is very small, but in this case, since the data has to propagate through all the nodes in the loop, the time difference may be of consecuence as the number of nodes increase.
- The process of detecting and cleaning up a failure in replication still needs manual intervention.
To go into the technicalities, lets say that NodeA, NodeB and NodeC have mysql installed on them. You need to have a mysql version >= 5.0.2 on all the nodes. Also all nodes must have the same mysql version, to maintain compatibility in replication between different versions.
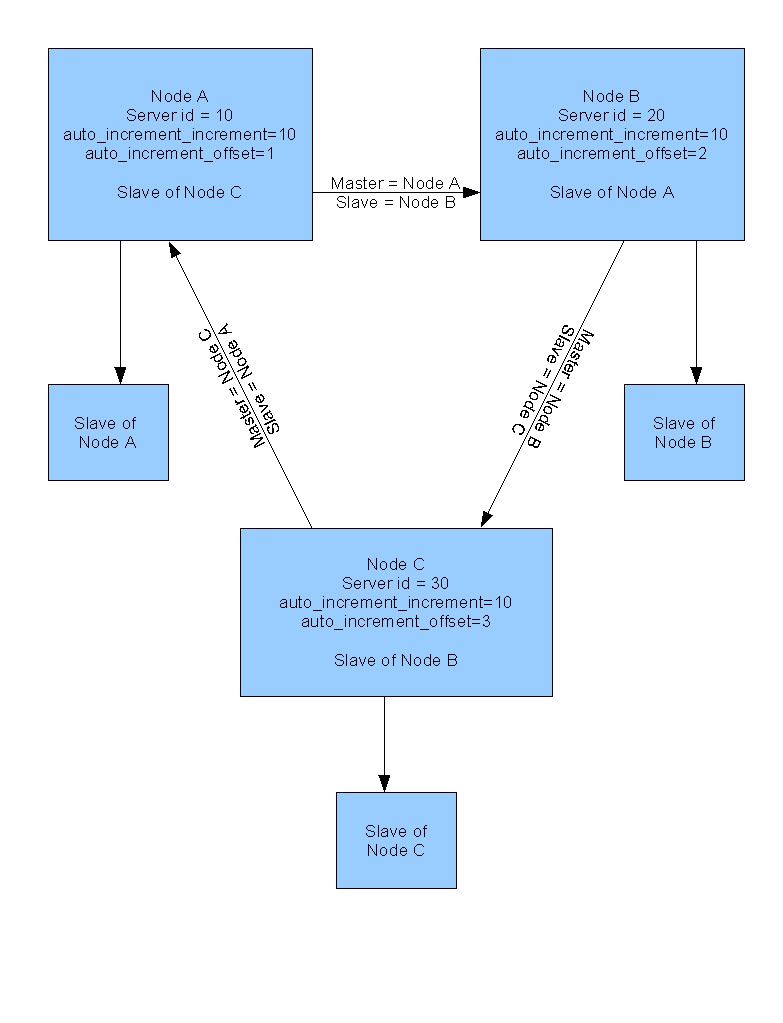
If you are new to mysql replication, please go through the following linkhttp://dev.mysql.com/doc/refman/5.1/en/replication-implementation.html. This will help you to understand how to setup mysql replication.
Following figure explains the complete architecture. You can also add extra slaves for all the nodes which can be used/added to the loop in case if any node goes down or for simple select queries - further increasing the performance.
The configuration files on different nodes were as follows
Node A
=====
[mysqld]
basedir=/usr/local/mysql5
datadir=/usr/local/mysql5/data
socket=/tmp/mysql5.sock
port=3306
# for replication
server-id=10
log-bin
log-slave-updates
replicate-same-server-id=0
auto_increment_increment=10
auto_increment_offset=1
master-host=NodeC_IP
master-user=repl
master-password=jayant
master-port=3306
report-host=NodeA
skip-slave-start
log-slow-queries
log-output=FILE
# log-queries-not-using-indexes
log-slow-admin-statements
[mysql.server]
user=mysql
basedir=/usr/local/mysql5
Node B
=====
[mysqld]
basedir=/usr/local/mysql5
datadir=/usr/local/mysql5/data
socket=/tmp/mysql5.sock
port=3306
# for replication
server-id=20
log-bin
log-slave-updates
replicate-same-server-id=0
auto_increment_increment=10
auto_increment_offset=2
master-host=NodeA_IP
master-user=repl
master-password=jayant
master-port=3306
report-host=NodeB
skip-slave-start
log-slow-queries
log-output=FILE
# log-queries-not-using-indexes
log-slow-admin-statements
[mysql.server]
user=mysql
basedir=/usr/local/mysql5
Node C
=====
[mysqld]
basedir=/usr/local/mysql5
datadir=/usr/local/mysql5/data
socket=/tmp/mysql5.sock
port=3306
# for replication
server-id=30
log-bin
log-slave-updates
replicate-same-server-id=0
auto_increment_increment=10
auto_increment_offset=3
master-host=NodeB_IP
master-user=repl
master-password=jayant
master-port=3306
report-host=NodeC
skip-slave-start
log-slow-queries
log-output=FILE
# log-queries-not-using-indexes
log-slow-admin-statements
[mysql.server]
user=mysql
basedir=/usr/local/mysql5
Once mysql on all 3 nodes are properly setup, all that needs to be done is run a "START SLAVE" command on all of them. This will bring the circular loop in function. Now you can have an array of mysql connections in your application and may be do a round robin execution of any type of queries (select, update, insert, delete) using the array on any of the machines in the cluster.
Points to be noted:
- server-id has to be different for each of the machine in the circular replication
- log-slave-updates tells the mysql slave to log queries that are replicated from master to its binary log, so that they can be passed on to who-so-ever is reading its binary log
- replicate-same-server-id tells the mysql slave not to replicate its own queries in circular replication. If this variable is ignored, the setup may result in an infinite loop where a query fired on node A may keep on replicating itself repeatedly. This variable should be set to 0 so that the mysql slave does not replicate events that have its own server id. Preventing infinite loops.
- auto_increment_offset determines the starting point of auto increment column values.
- auto_increment_increment determines the increment between auto increment values.
auto_increment_increment and auto_increment_offset have to be used so that auto increment values on different servers do not conflict with each other. If this is not used, then, when a query is fired on node A and node B simultaneously or may be the replication between node A and node B breaks after the first query is fired on node A and before the second query is fired on node B.
On any Node
create table x(id int auto_increment primary key, val varchar(250) null);
On Node A
insert into table x(val) values ('in node a');
On Node B
insert into table x(val) values ('in node b');
In this case a "duplicate primary key" error will come when the query from node A is replicated and run on node B.
But if these variables are set appropriately, there would be no such issue. The above setup has auto_increment_increment set to 10 allowing addition of upto 10 nodes in the cluster.
For more details on this you can refer http://www.onlamp.com/pub/a/onlamp/2006/04/20/advanced-mysql-replication.html. It is a very lengthy article but very detailed. Explains failover mechanisms and also provides some scripts for detecting breakages in the loop.
Courtesy goes to Jayant.
Monday, June 7, 2010
MySQL Error Number 1005 Can’t create table ‘.\mydb\#sql-328_45.frm’ (errno: 150)
MySQL Error Number 1005
Can’t create table ‘.\mydb\#sql-328_45.frm’ (errno: 150)
If you get this error while trying to create a foreign key, it can be pretty frustrating. The error about not being able to create a .frm file seems like it would be some kind of OS file permission error or something but this is not the case. This error has been reported as a bug on the MySQL developer list for ages, but it is actually just a misleading error message.
In every case this is due to something about the relationship that MySQL doesn’t like. Unfortunately it doesn’t specify what the exact issue is. Here is a running list of causes that people have reported for the dreaded errno 150. I’ve tried to put them in order based on the frequency that I hear about a particular cause.
You may want to start by running the MySQL command “SHOW INNODB STATUS” immediately after receiving the error. This command displays log info and error details. (Thanks Jonathan for the tip)
Note: If your script runs fine on one server, but gives an error when you try to run it on a different server, then there is a good chance that #6 is the problem. Different versions of MySQL have different default charset setting.
The MySQL documentation includes a page explaining requirements for foreign keys. Though they don’t specifically indicate it, these are all potential causes of errno 150. If you still haven’t solved your problem you may want to check there for deeper technical explainations.If you run into this error and find that it’s caused by something else, please leave a comment and I’ll add it to the list.
Can’t create table ‘.\mydb\#sql-328_45.frm’ (errno: 150)
If you get this error while trying to create a foreign key, it can be pretty frustrating. The error about not being able to create a .frm file seems like it would be some kind of OS file permission error or something but this is not the case. This error has been reported as a bug on the MySQL developer list for ages, but it is actually just a misleading error message.
In every case this is due to something about the relationship that MySQL doesn’t like. Unfortunately it doesn’t specify what the exact issue is. Here is a running list of causes that people have reported for the dreaded errno 150. I’ve tried to put them in order based on the frequency that I hear about a particular cause.
You may want to start by running the MySQL command “SHOW INNODB STATUS” immediately after receiving the error. This command displays log info and error details. (Thanks Jonathan for the tip)
Note: If your script runs fine on one server, but gives an error when you try to run it on a different server, then there is a good chance that #6 is the problem. Different versions of MySQL have different default charset setting.
Known Causes:
1. The two key fields type and/or size doesn’t match exactly. For example, if one is INT(10) the key field needs to be INT(10) as well and not INT(11) or TINYINT. You may want to confirm the field size using SHOW CREATE TABLE because Query Browser will sometimes visually show just INTEGER for both INT(10) and INT(11). You should also check that one is not SIGNED and the other is UNSIGNED. They both need to be exactly the same. (More about signed vs unsigned here).
2. One of the key field that you are trying to reference does not have an index and/or is not a primary key. If one of the fields in the relationship is not a primary key, you must create an index for that field. (thanks to Venkatesh and Erichero and Terminally Incoherent for this tip)
3. The foreign key name is a duplicate of an already existing key. Check that the name of your foreign key is unique within your database. Just add a few random characters to the end of your key name to test for this. (Thanks to Niels for this tip)
4. One or both of your tables is a MyISAM table. In order to use foreign keys, the tables must both be InnoDB. (Actually, if both tables are MyISAM then you won’t get an error message – it just won’t create the key.) In Query Browser, you can specify the table type.
5. You have specified a cascade ON DELETE SET NULL, but the relevant key field is set to NOT NULL. You can fix this by either changing your cascade or setting the field to allow NULL values. (Thanks to Sammy and J Jammin)
6. Make sure that the Charset and Collate options are the same both at the table level as well as individual field level for the key columns. (Thanks to FRR for this tip)
7. You have a default value (ie default=0) on your foreign key column (Thanks to Omar for the tip)
8. One of the fields in the relationship is part of a combination (composite) key and does not have it’s own individual index. Even though the field has an index as part of the composite key, you must create a separate index for only that key field in order to use it in a constraint. (Thanks to Alex for this tip)
9. You have a syntax error in your ALTER statement or you have mistyped one of the field names in the relationship (Thanks to Christian & Mateo for the tip)
10. The name of your foreign key exceeds the max length of 64 chars. (Thanks to Nyleta for the tip)
The MySQL documentation includes a page explaining requirements for foreign keys. Though they don’t specifically indicate it, these are all potential causes of errno 150. If you still haven’t solved your problem you may want to check there for deeper technical explainations.If you run into this error and find that it’s caused by something else, please leave a comment and I’ll add it to the list.
Monday, May 31, 2010
Great tip for Windows users – Uninstall Programs from Command Line
It has happened to most of the Windows Administrators before: We go to uninstall a program, on Windows Server, and when we open “Add/Remove Programs” it just sits there loading forever, while you are waiting to try to move on to the next thing. One great way to get around this problem and be able to get back to your day job is to just go command line with the Windows Instrumentation command-line interface (WMIC). It’s much faster than using the dreaded “Add/Remove” programs and lets us get some bragging rights when we talk to our UNIX/LINUX friends.
Below is some information on how to use WMIC.
- Open the command prompt.
- Input WMIC and press Enter. You should see something like wmic:root\cli>
- Type in the following command and press enter: product get name
- To uninstall a program type: product where name=”Your program name” call uninstall
- When you are prompted type y to confirm the uninstall and press Enter
That’s it! Pretty simple.
Below is some information on how to use WMIC.
- Open the command prompt.
- Input WMIC and press Enter. You should see something like wmic:root\cli>
- Type in the following command and press enter: product get name
- To uninstall a program type: product where name=”Your program name” call uninstall
- When you are prompted type y to confirm the uninstall and press Enter
That’s it! Pretty simple.
Thursday, May 20, 2010
Mastering the art of indexing
Check out this SlideShare Presentation: This is a good presentation on Indexing and how it relates to INNODB.
More mastering the art of indexing
View more presentations from Yoshinori Matsunobu.
Transfer PuTTY settings between computers
Putty stores its settings in the Windows registry. To save a backup of your Putty settings, you'll need to export this registry key to a file.
HKEY_CURRENT_USER\Software\SimonTatham
From the Start->Run Dialog enter the following.
regedit /e "%userprofile%\desktop\putty.reg" HKEY_CURRENT_USER\Software\Simontatham
The above command will place a copy of the backup on your desktop.
Tuesday, April 20, 2010
MySQL blocked because of Too Many connections
MySQL server will block connections in case of too many connections. After solving the problem creating too many connections from web server, in some cases still we can see that MySQL blocks the webhosts.
We had to run the following command in mysql server, at the command prompt:
mysqladmin flush-hosts -uroot -pxxxx
Friday, February 19, 2010
To display all users Grants
To display all users as "show grants for..."
mysql -Bse "SELECT CONCAT('SHOW GRANTS FOR \'', user ,'\'@\'', host, '\';') FROM mysql.user" | mysql -Bs | sed 's/$/;/g'
mysql -Bse "SELECT CONCAT('SHOW GRANTS FOR \'', user ,'\'@\'', host, '\';') FROM mysql.user" | mysql -Bs | sed 's/$/;/g'
MySQL Tips to Verify database Objects
Verifing database Objects:
1. Verify table.
a. SHOW TABLE STATUS LIKE '%user%'\G
b. SHOW TABLE STATUS from forum LIKE '%user%' \G
2. It will show you all tables have MyISAM engine.
a. SELECT TABLE_SCHEMA, table_name, table_type, engine From information_schema.tables where engine='MyISAM';
3. To know rows per table, you can use a query like this:
a. SELECT table_name, table_rows FROM INFORMATION_SCHEMA.TABLES WHERE TABLE_SCHEMA = 'xyz';
4. Verify you procedure / function.
a. SHOW procedure/FUNCTION STATUS LIKE ´hello´G
b. show create procedure/function hello\G
5. Routines
a. select routine_name from information_schema.routines; // list of all the routines in the system
b. select routine_name, routine_schema, routine_type from information_schema.routines; // This lists all of the routines in the system. With additional Information like the database the routines belongs too and also distinct between the different routines.
c. select routine_name, routine_schema, routine_type from information_schema.routines where routine_schema = database() // This time we can see just the routines for the currently selected database.
6. Triggers
a. select TRIGGER_SCHEMA,TRIGGER_NAME from INFORMATION_SCHEMA.TRIGGERS;
b. select TRIGGER_NAME from INFORMATION_SCHEMA.TRIGGERS where TRIGGER_SCHEMA = database();
Wednesday, December 23, 2009
Extracting a single table from a huge mysqldump file
Someday you may find yourself in a situation where you want to restore a single table of your MySQL database. Hopefully this is in a lab situation or on a personal development box somewhere – but even if it is production you need not fear. There are plenty of articles about restoring your entire database, but not a lot about restoring a single table. What if your coding compadre’s mistakenly change the field for every row in a table on you, or maybe you want to alter all of the data in a table but want an easy way to ‘reset’ things so that you can tweak and try again? If you aren’t taking table level backups restoring that single table can be rather difficult. You’ll locate your MySQL dump, and realize that it is huge (even when zipped), and you don’t want to wait around to restore your entire DB in order to recover one measly table. So what to do? The file is too large to open in a text editor and do anything meaningful with it – it would take way too much time. This is where a little bit of ‘awk‘ magic can save your day. Using awk, you can extract a block of text from the MySQL dump that pertains to the table you want to work with.
First, you have to know where in your mysqldump output you want to begin your extraction, and where you want to end it. The key here is finding something unique at the beginning and ending of the block that won’t be found anywhere else.
A sample mysqldump contains something like the following:
--
-- Table structure for table `abc`
--
. . .
DROP TABLE IF EXISTS `abc`;
CREATE TABLE `abc` ( . . .
LOCK TABLES `abc` WRITE;
INSERT INTO `abc` VALUES (1,0,'2 . . .
UNLOCK TABLES;
. . .
--
-- Table structure for table `xyz`
--
As you can see, we have a line with the comment “Table structure for table `abc`”, then all of the dropping, creating, and inserting for the table, and then another comment for the next table. These two lines are perfect for grabbing all of the operations pertinent to our one table.
To extract the dump for a single table from an entire database dump, run the following from a command prompt:
$ awk ‘/Table structure for table .abc./,/Table structure for table .xyz./{print}’ mydumpfile.sql > /tmp/extracted_table_abc.sql
The awk command is very powerful – the above command searches through the dump file, and as soon as it matches a line containing the first search string (denoted by the first set of slashes), it prints that line and every subsequent line until it encounters a line containing the second search string (denoted by the second set of slashes). FYI, the periods surrounding the table names above are wildcard characters.
Now the extracted_table.sql file contains the SQL to restore your table! One final thing: There are usually various parameters at the top of your mysqldump file that you may need to set before restoring your table, depending on the complexity of your database (i.e. disabling foreign key checks.)
To restore your table, you’d run:
$ mysql -u user -ppwd mydb < /tmp/extracted_table_abc.sql
Alternate Method:
A second option is to restore your data into a temporary database (assuming you have the disk space), extract the table you’re interested in to it’s own dump file, and then restore that dump file to your original database.
Create a new database, name it something easy to distinguish from your production one, i.e. fakedb.
Restore your data to the fakedb with a command like this:
$ mysql -u user -ppassword fakedb <>
From fakedb, grab the data you want from your target table:
mysql> select * from targettable into outfile “/tmp/mytablebackup.bak”;
On the production db, where you have your undesired data, clear it all out with:
mysql> delete from baddatatable;
Import the good stuff back into it:
mysql> load data infile “/tmp/mytablebackup.bak” into table baddatatable;
Enjoy J
MySQL – Extractiing a Single Table from a mysqldump File
If you want to extract "xyz" table from "example.sql" dumpfile, the below statement can extract the desired table.
sed -n '/^CREATE TABLE `xyz`/,/^-- Table structure for table ` `/p' example.sql > xyz.sql 2>error &
sed -n '/^CREATE TABLE `xyz`/,/^-- Table structure for table ` `/p' example.sql > xyz.sql 2>error &
Slow queries log, general log...
MySQL has built-in functionality that allows you to log SQL queries to a file , You can enable the full SQL queries logs to a file or only slow running queries log. It is easy for us to troubleshoot/ debug the sql statement if SQL queries log enable , The slow query log is used to find queries that take a long time to execute and are therefore candidates for optimization.
To enable you just need to add some lines to your my.cnf file, and restart. Add the following:
* To enable slow Query Log only
log-slow-queries = /var/log/mysql/mysql-slow.log
long_query_time = 1
After enabling slow query, mysqld writes a statement to the slow query log file and it consists of all SQL statements that took more than long_query_time seconds to execute. The time to acquire the initial table locks is not counted as execution time. mysqld only log after SQL statements has been executed and after all locks have been released, so log order might be different from execution order. The minimum and default values of long_query_time are 1 and 10, respectively.
* To enable full Log Query
log=/var/log/mysqldquery.log
The above will log all queries to the log file.
Selecting Queries to Optmize
• The slow query log
– Logs all queries that take longer than long_query_time
– Can also log all querie s that don’t use indexes with
--log-queries-not-using-indexes
– To log slow administatve commands use
--log-slow-admin-statements
– To analyze the contents of the slow log use
mysqldumpslow
To enable you just need to add some lines to your my.cnf file, and restart. Add the following:
* To enable slow Query Log only
log-slow-queries = /var/log/mysql/mysql-slow.log
long_query_time = 1
After enabling slow query, mysqld writes a statement to the slow query log file and it consists of all SQL statements that took more than long_query_time seconds to execute. The time to acquire the initial table locks is not counted as execution time. mysqld only log after SQL statements has been executed and after all locks have been released, so log order might be different from execution order. The minimum and default values of long_query_time are 1 and 10, respectively.
* To enable full Log Query
log=/var/log/mysqldquery.log
The above will log all queries to the log file.
Selecting Queries to Optmize
• The slow query log
– Logs all queries that take longer than long_query_time
– Can also log all querie s that don’t use indexes with
--log-queries-not-using-indexes
– To log slow administatve commands use
--log-slow-admin-statements
– To analyze the contents of the slow log use
mysqldumpslow
Using AWK: For Pattern Matching and Processing
awk 'pattern {action}' filename
Reads one line at a time from file, checks for pattern match, performs action if pattern matched pattern.
NR is a special awk variable meaning the line number of the current record
can use a line number, to select a specific line, by comparing it to NR (for example: NR == 2)
can specify a range of line numbers (for example: NR == 2, NR == 4)
can specify a regular expression, to select all lines that match
$n are special awk variables, meaning the value of the nth field (field delimiter is space or tab)
$0 is the entire record
can use field values, by comparing to $n (for example: $3 == 65)
every line is selected if no pattern is specified
Instructions
print - print line(s) that match the pattern, or print fields within matching lines
print is default if no action is specified
there are many, many instruction, including just about all C statements with similar syntax
other instructions will be covered in future courses
examples, using the file testfile.
awk 'NR == 2, NR == 4' testfile - print the 2nd through 4th lines (default action is to print entire line)
awk '/chevy/' testfile - print only lines matching regular expression, same as grep 'chevy' testfile
awk '{print $3, $1}' testfile - print third and first field of all lines (default pattern matches all lines)
awk '/chevy/ {print $3, $1}' testfile - print third and first fiield of lines matching regular expression
awk '$3 == 65' testfile - print only lines with a third field value of 65
awk '$5 < = 3000' testfile - print only lines with a fifth field value that is less than or equal to 3000
awk '{print $1}' testfile - print first field of every record
awk '{print $3 $1}' testfile
awk '{print $3, $1}' testfile - inserts output field separator (variable OFS, default is space)
awk -F, '{print $2}' testfile - specifies that , is input field separator, default is space or tab
awk '$2 ~ /[0-9]/ {print $3, $1}' testfile - searches for reg-exp (a digit) only in the second field
awk '{printf "%-30s%20s\n", $3, $2}' testfile - print 3rd field left-justified in a 30 character field, 2nd field right-justified in a 20 character field, then skip to a new line (required with printf)
awk '$3 <= 23' testfile - prints lines where 3rd field has a value <= 23
awk '$3 <='$var1' {print $3}' testfile - $var1 is a shell variable, not an awk variable, e.g. first execute: var1=23
awk '$3<='$2' {$3++} {print $0}' testfile - if field 3 <= argument 2 then increment field 3, e.g. first execute: set xxx 23
awk '$3> 1 && $3 < 23' testfile - prints lines where 3rd field is in range 1 to 23
awk '$3 <> 4' testfile - prints lines where 3rd field is outside of range 2 to 4
awk '$3 < "4"' testfile - double quotes force string comparison
NF is an awk variable meaning # of fields in current record
awk '! (NF == 4)' testfile - lines without 4 fields
NR is an awk variable meaning # of current record
awk 'NR == 2,NR==7' testfile - range of records from record number 2 to 7
BEGIN is an awk pattern meaning "before first record processed"
awk 'BEGIN {OFS="~"} {print $1, $2}' testfile - print 1st and 2nd field of each record, separated by ~
END is an awk pattern meaning "after last record processed"
awk '{var+=$3} END {print var}' testfile - sum of 3rd fields in all records
awk '{var+=$3} END {print var/NR}' testfile - average of 3rd fields in all records - note that awk handles decimal arithmetic
awk '$5 > var {var=$5} END {print var}' testfile - maximum of 5th fields in all records
awk '$5 > var {var=$5} END {print var}' testfile - maximum of 5th fields in all records
sort -rk5 testfile | awk 'NR==1 {var=$5} var==$5 {print $0}' - print all records with maximum 5th field
Simple awk operations involving functions within the command line:
awk '/chevy/' testfile
# Match lines (records) that contain the keyword chevy note that chevy is a regular expression...
awk '{print $3, $1}' testfile
# Pattern not specified - therefore, all lines (records) for fields 3 and 1 are displayed
# Note that comma (,) between fields represents delimiter (ie. space)
awk '/chevy/ {print $3, $1}' testfile
# Similar to above, but for chevy
awk '/^h/' testfile
# Match testfile that begin with h
awk '$1 ~ /^h/' testfile ### useful ###
# Match with field #1 that begins with h
awk '$1 ~ /h/' testfile
# Match with field #1 any epression containing the letter h
awk '$2 ~ /^[tm]/ {print $3, $2, "$" $5}' testfile
# Match testfile that begin with t or m and display field 3 (year), field 2 (model name) and then $ followed by field 4 (price)
--------------------------------------------------------------------------------------------------
Complex awk operations involving functions within the command line:
awk ?/chevy/ {print $3, $1}? testfile
# prints 3rd & 1st fields of record containing chevy
awk ?$1 ~ /^c/ {print $2, $3}? testfile
# print 2nd & 3rd fields of record with 1st field beginning with c
awk ?NR==2 {print $1, $4}? testfile
# prints 1st & 4th fields of record for record #2
awk ?NR==2, NR==8 {print $2, $3}? testfile
# prints 2nd & 3rd fields of record for records 2 through 8
awk ?$3 >= 65 {print $3, $1}? testfile
# prints 3rd & 1st fields of record with 3rd field >= 65
awk ?$5 >= ?2000? && $5 < ?9000? {print $2, $3}? testfile
# prints 2nd & 3rd fields of record within range of 2000 to under 9000
Reads one line at a time from file, checks for pattern match, performs action if pattern matched pattern.
NR is a special awk variable meaning the line number of the current record
can use a line number, to select a specific line, by comparing it to NR (for example: NR == 2)
can specify a range of line numbers (for example: NR == 2, NR == 4)
can specify a regular expression, to select all lines that match
$n are special awk variables, meaning the value of the nth field (field delimiter is space or tab)
$0 is the entire record
can use field values, by comparing to $n (for example: $3 == 65)
every line is selected if no pattern is specified
Instructions
print - print line(s) that match the pattern, or print fields within matching lines
print is default if no action is specified
there are many, many instruction, including just about all C statements with similar syntax
other instructions will be covered in future courses
examples, using the file testfile.
awk 'NR == 2, NR == 4' testfile - print the 2nd through 4th lines (default action is to print entire line)
awk '/chevy/' testfile - print only lines matching regular expression, same as grep 'chevy' testfile
awk '{print $3, $1}' testfile - print third and first field of all lines (default pattern matches all lines)
awk '/chevy/ {print $3, $1}' testfile - print third and first fiield of lines matching regular expression
awk '$3 == 65' testfile - print only lines with a third field value of 65
awk '$5 < = 3000' testfile - print only lines with a fifth field value that is less than or equal to 3000
awk '{print $1}' testfile - print first field of every record
awk '{print $3 $1}' testfile
awk '{print $3, $1}' testfile - inserts output field separator (variable OFS, default is space)
awk -F, '{print $2}' testfile - specifies that , is input field separator, default is space or tab
awk '$2 ~ /[0-9]/ {print $3, $1}' testfile - searches for reg-exp (a digit) only in the second field
awk '{printf "%-30s%20s\n", $3, $2}' testfile - print 3rd field left-justified in a 30 character field, 2nd field right-justified in a 20 character field, then skip to a new line (required with printf)
awk '$3 <= 23' testfile - prints lines where 3rd field has a value <= 23
awk '$3 <='$var1' {print $3}' testfile - $var1 is a shell variable, not an awk variable, e.g. first execute: var1=23
awk '$3<='$2' {$3++} {print $0}' testfile - if field 3 <= argument 2 then increment field 3, e.g. first execute: set xxx 23
awk '$3> 1 && $3 < 23' testfile - prints lines where 3rd field is in range 1 to 23
awk '$3 <> 4' testfile - prints lines where 3rd field is outside of range 2 to 4
awk '$3 < "4"' testfile - double quotes force string comparison
NF is an awk variable meaning # of fields in current record
awk '! (NF == 4)' testfile - lines without 4 fields
NR is an awk variable meaning # of current record
awk 'NR == 2,NR==7' testfile - range of records from record number 2 to 7
BEGIN is an awk pattern meaning "before first record processed"
awk 'BEGIN {OFS="~"} {print $1, $2}' testfile - print 1st and 2nd field of each record, separated by ~
END is an awk pattern meaning "after last record processed"
awk '{var+=$3} END {print var}' testfile - sum of 3rd fields in all records
awk '{var+=$3} END {print var/NR}' testfile - average of 3rd fields in all records - note that awk handles decimal arithmetic
awk '$5 > var {var=$5} END {print var}' testfile - maximum of 5th fields in all records
awk '$5 > var {var=$5} END {print var}' testfile - maximum of 5th fields in all records
sort -rk5 testfile | awk 'NR==1 {var=$5} var==$5 {print $0}' - print all records with maximum 5th field
Simple awk operations involving functions within the command line:
awk '/chevy/' testfile
# Match lines (records) that contain the keyword chevy note that chevy is a regular expression...
awk '{print $3, $1}' testfile
# Pattern not specified - therefore, all lines (records) for fields 3 and 1 are displayed
# Note that comma (,) between fields represents delimiter (ie. space)
awk '/chevy/ {print $3, $1}' testfile
# Similar to above, but for chevy
awk '/^h/' testfile
# Match testfile that begin with h
awk '$1 ~ /^h/' testfile ### useful ###
# Match with field #1 that begins with h
awk '$1 ~ /h/' testfile
# Match with field #1 any epression containing the letter h
awk '$2 ~ /^[tm]/ {print $3, $2, "$" $5}' testfile
# Match testfile that begin with t or m and display field 3 (year), field 2 (model name) and then $ followed by field 4 (price)
--------------------------------------------------------------------------------------------------
Complex awk operations involving functions within the command line:
awk ?/chevy/ {print $3, $1}? testfile
# prints 3rd & 1st fields of record containing chevy
awk ?$1 ~ /^c/ {print $2, $3}? testfile
# print 2nd & 3rd fields of record with 1st field beginning with c
awk ?NR==2 {print $1, $4}? testfile
# prints 1st & 4th fields of record for record #2
awk ?NR==2, NR==8 {print $2, $3}? testfile
# prints 2nd & 3rd fields of record for records 2 through 8
awk ?$3 >= 65 {print $3, $1}? testfile
# prints 3rd & 1st fields of record with 3rd field >= 65
awk ?$5 >= ?2000? && $5 < ?9000? {print $2, $3}? testfile
# prints 2nd & 3rd fields of record within range of 2000 to under 9000
Using mysqldumpslow for analyzing mysql slow queries
First enable slow query logging, then generate a slow query and finally look at the slow query log.
mysqldumpslow
This program parses and summarizes a 'slow query log'.
-v verbose
-d debug
-s=WORD
what to sort by (t, at, l, al, r, ar etc)
-r reverse the sort order (largest last instead of first)
-t=NUMBER
just show the top n queries
-a don't abstract all numbers to N and strings to 'S'
-n=NUMBER
abstract numbers with at least n digits within names
-g=WORD
grep: only consider stmts that include this string
-h=WORD
hostname of db server for *-slow.log filename (can be wildcard)
-i=WORD
name of server instance (if using mysql.server startup script)
-l don't subtract lock time from total time
eg.
1. mysqldumpslow -t 10 /var/lib/mysql/mysql-slow.log.1 > /tmp/top_ten_slow_query.txt
It will put top ten slow query in file /tmp/top_ten_slow_query.txt
2. mysqldumpslow -s c -a -t 10 /var/lib/mysql/mysql-slow.log.1 > /tmp/top_ten_repeat_slow_query.txt
It will put top ten repeat slow query in file top_ten_repeat_slow_query.txt
mysqldumpslow
This program parses and summarizes a 'slow query log'.
-v verbose
-d debug
-s=WORD
what to sort by (t, at, l, al, r, ar etc)
-r reverse the sort order (largest last instead of first)
-t=NUMBER
just show the top n queries
-a don't abstract all numbers to N and strings to 'S'
-n=NUMBER
abstract numbers with at least n digits within names
-g=WORD
grep: only consider stmts that include this string
-h=WORD
hostname of db server for *-slow.log filename (can be wildcard)
-i=WORD
name of server instance (if using mysql.server startup script)
-l don't subtract lock time from total time
eg.
1. mysqldumpslow -t 10 /var/lib/mysql/mysql-slow.log.1 > /tmp/top_ten_slow_query.txt
It will put top ten slow query in file /tmp/top_ten_slow_query.txt
2. mysqldumpslow -s c -a -t 10 /var/lib/mysql/mysql-slow.log.1 > /tmp/top_ten_repeat_slow_query.txt
It will put top ten repeat slow query in file top_ten_repeat_slow_query.txt
Extract single db from dump file
using sed to extract single database from the dumpfile:
=========================================
sed -n '/^-- Current Database: `dbname`/,/^-- Current Database: `/p' dumpfile > dbname.sql 2>error
eg:
sed -n '/^-- Current Database: `blogs`/,/^-- Current Database: `/p' dump.sql > blogs.sql 2>error
we can also use "awk" for the same.
For extracting a particular table from a dump file, click here...
=========================================
sed -n '/^-- Current Database: `dbname`/,/^-- Current Database: `/p' dumpfile > dbname.sql 2>error
eg:
sed -n '/^-- Current Database: `blogs`/,/^-- Current Database: `/p' dump.sql > blogs.sql 2>error
we can also use "awk" for the same.
For extracting a particular table from a dump file, click here...
Subscribe to:
Posts (Atom)


